The Quintessential Guide to Auto Chess Formation and Positioning.
Hello everybody!
This is the one. This guide holds the secrets to how to manage your formation. I’ll go over Piece “Engagements”, “Zone of Engagement”, the logic of how pieces choose where to move, how pieces choose what units they’ll target, the exceptions to the rules, how to best order your frontline, as well as your backline, and more.
A Few Terms
Because this is a particularly technical guide, we’re going to need to get a few things straight.
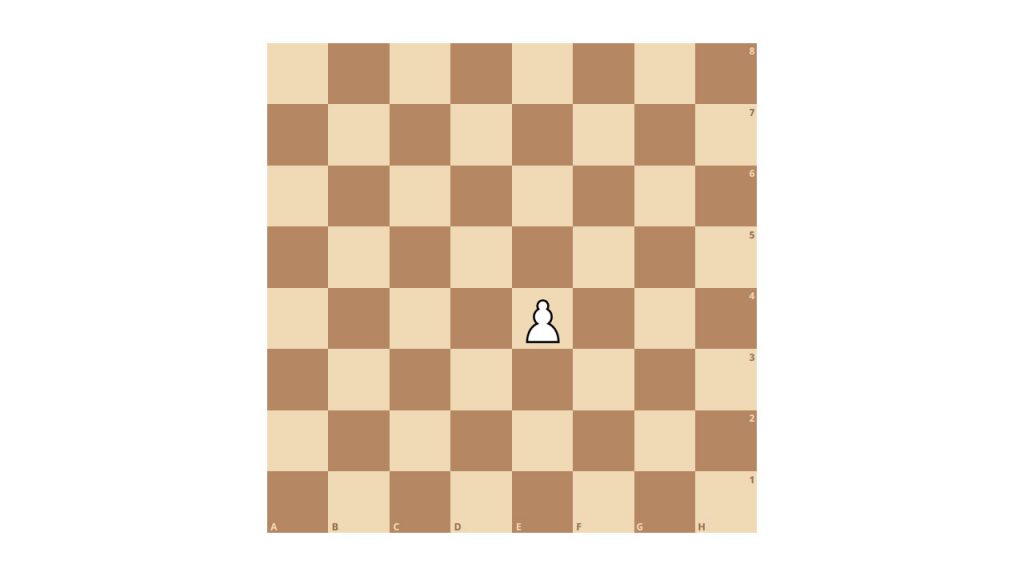
I’ll be using chess’ algebraic notation to name squares, with the point of view of the white pieces (a1 is the bottom left, h1 is the bottom right, a2 is right above a1). For a visual reference, I’ll also be using lichess’s free board editor. For example: The pawn is on e4 (See Above).
With all of that out of the way, let’s get started.
Zone of Engagement
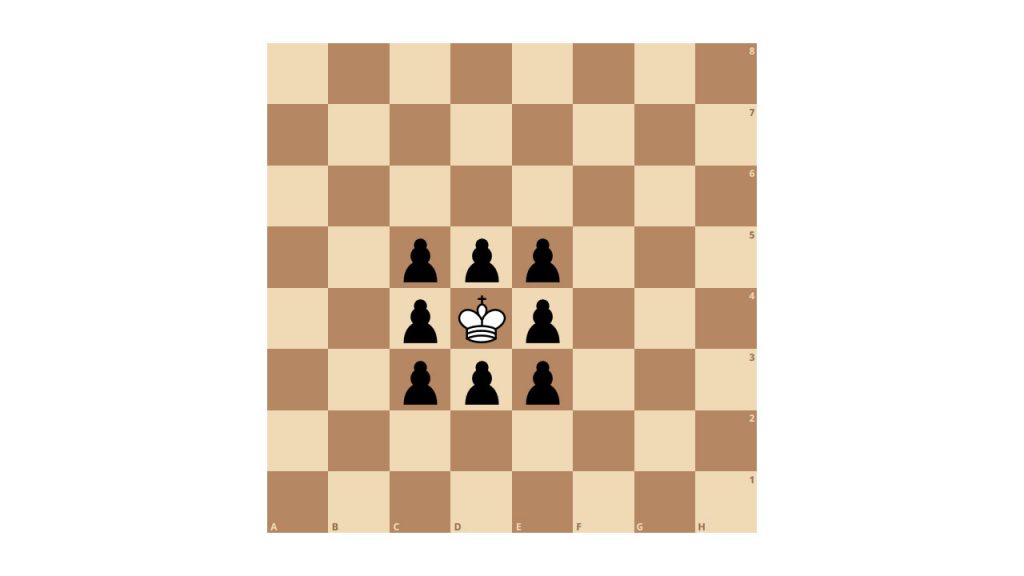
The foundation of all of this is the understanding of a piece’s “Zone of Engagement”. The “Zone of Engagement” surrounds the piece; it consists of the 8 squares adjacent to any given piece (See Above).
When a piece enters another piece’s Zone of Engagement, the two pieces are Engaged. An Engaged piece cannot move unless an ability moves it (like Water spirit’s dash, or being tossed by Stone Spirit). For Melee pieces, their Zone of Engagement is the same as their auto attack range.
Part 1: Rules For Targeting Opponent Pieces
A piece chooses their auto attack target based on the following:
Rule #1: They will target the closest enemy piece in their attack range.
Rule #2: If there is no enemy piece in their attack range, they choose their target based on the following:
Non Assassin Melee Units:
Will jump to the nearest square that is also an enemy piece’s zone of engagement. They cannot jump over pieces. If this is impossible, they will move one square closer to the nearest enemy (usually sideways or diagonal, since there are allies in the way of them jumping over), until they’ve got a clear shot to jump to a zone of engagement square.
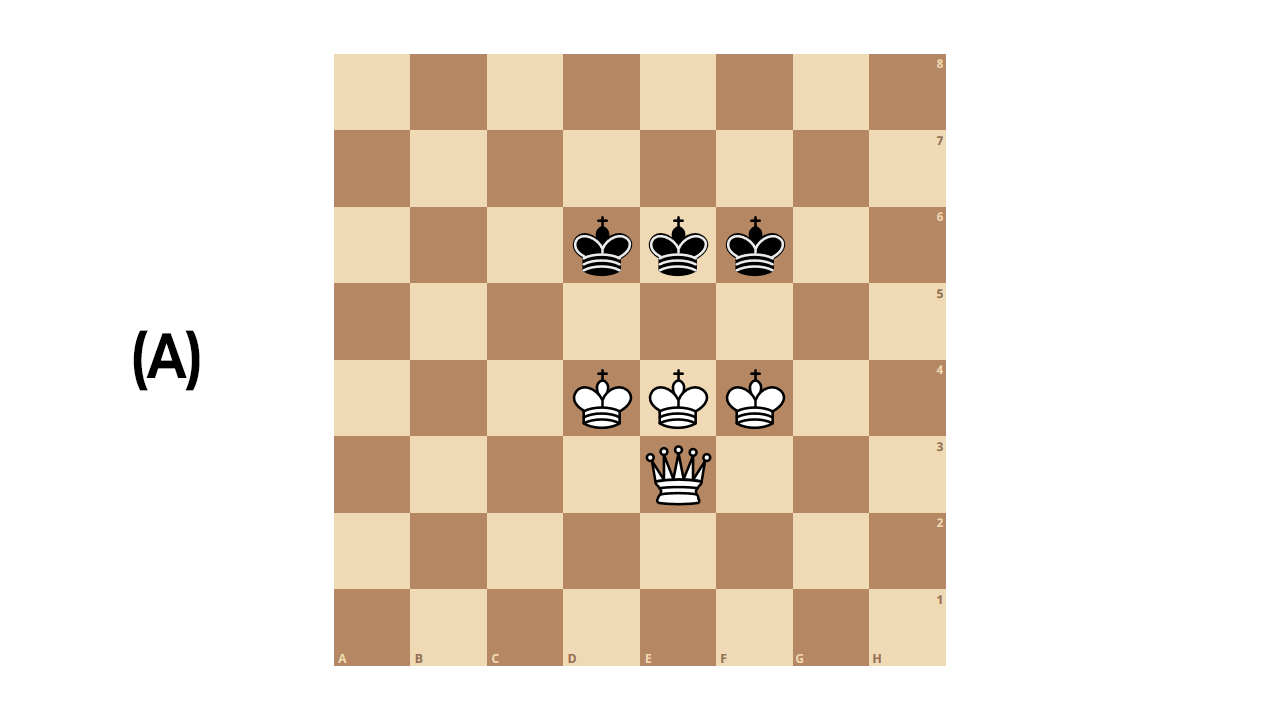
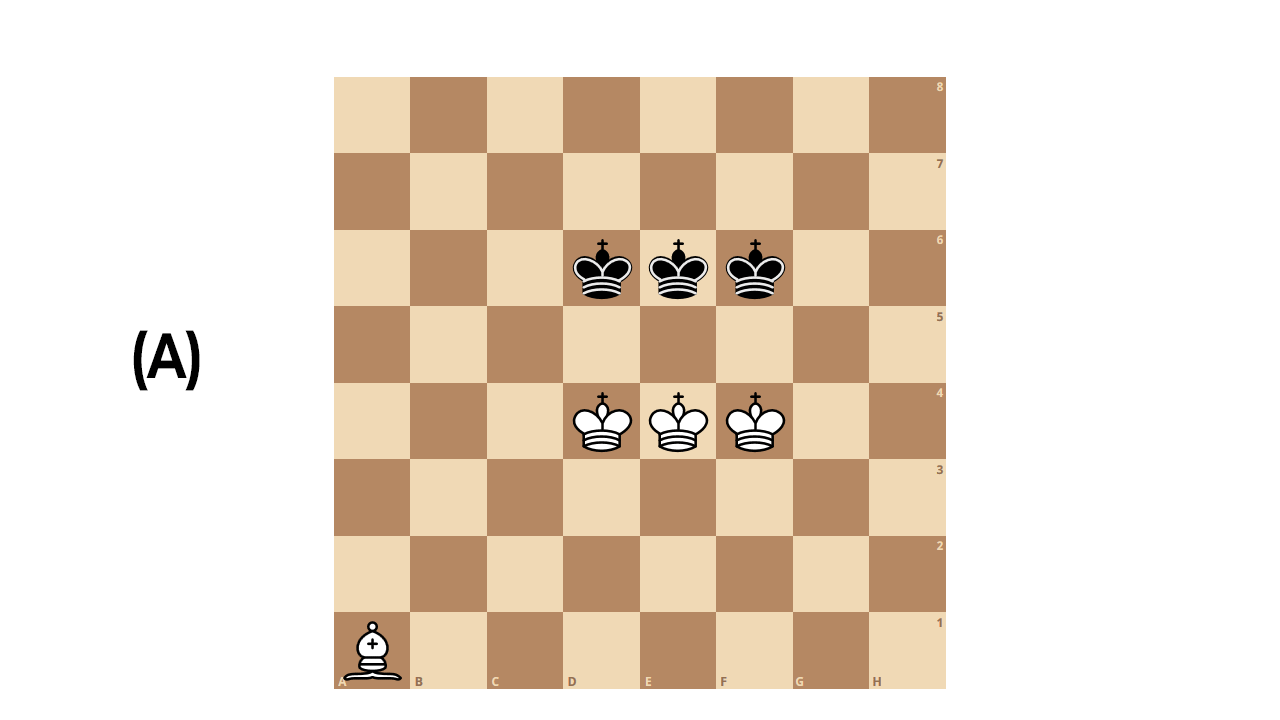
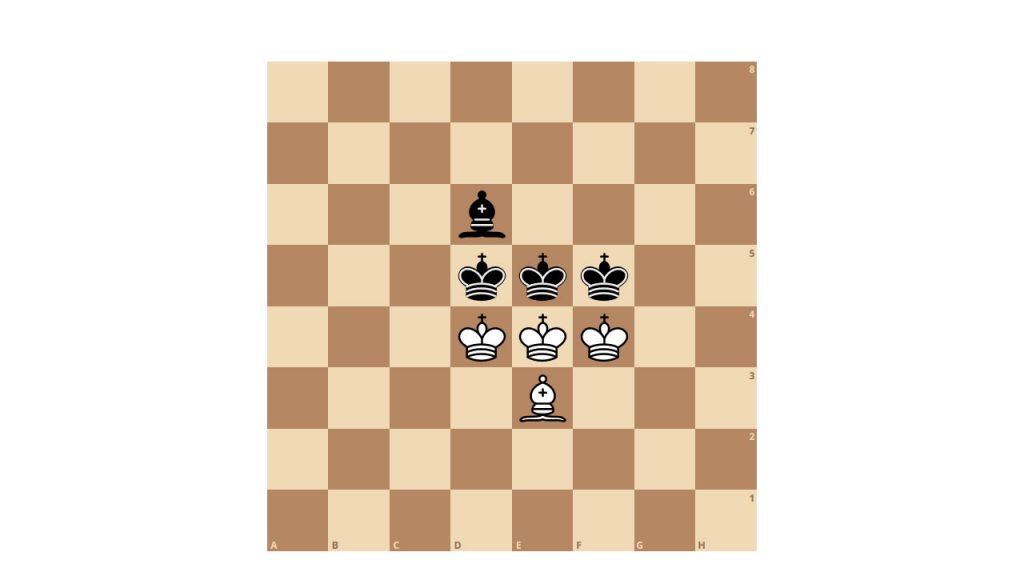
Example (Position A): We have non-assassin Melee units on d4, e4, and f4, and another on e3. The enemy has melee units on d6, e6, and f6. Our three units on the fourth rank move forward, while our unit on the third rank will move towards d4 or f4 (Position B), then into the nearest zone of engagement (Position C).
Assassin Melee Units:
Will jump to the furthest square that is also an enemy piece’s zone of engagement at the start of the combat round. They can jump over pieces.
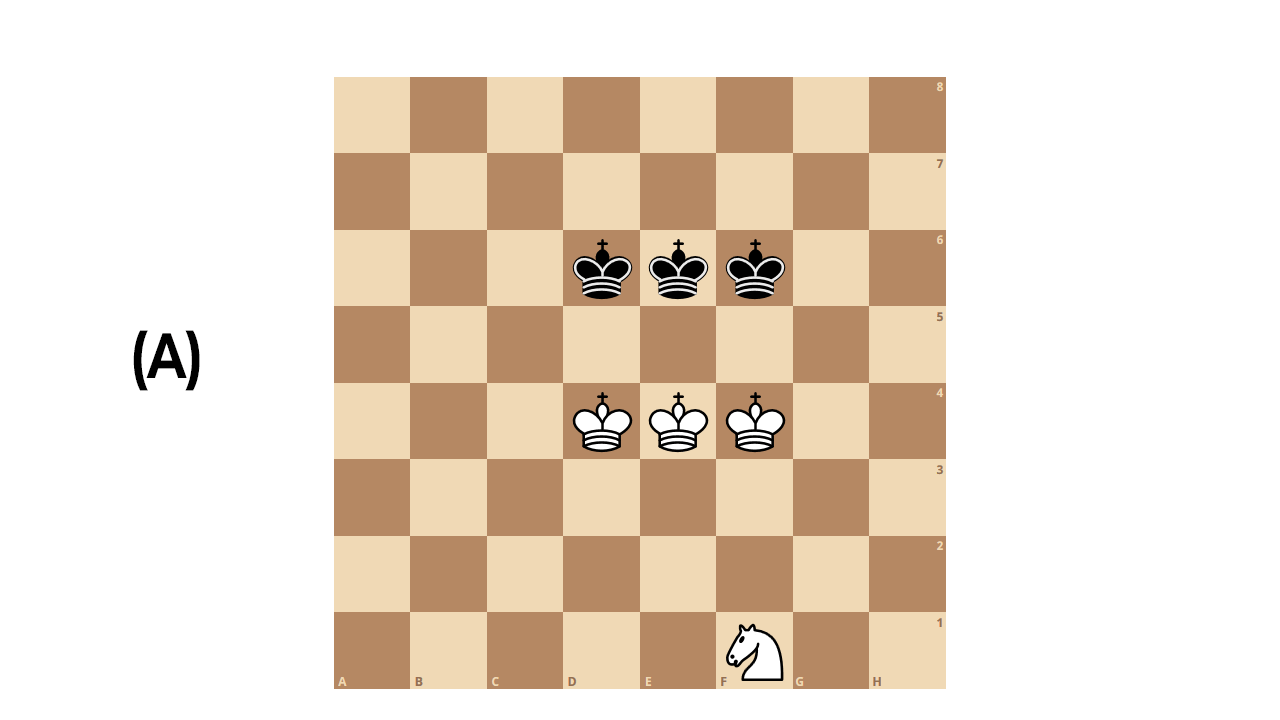
Example (Position A): We have non-assassin Melee units on d4, e4, and f4. We have an assassin melee unit on f1. The enemy has melee units on d6, e6, and f6. Our three units on the fourth rank move forward, while our assassin jumps to the furthest square that is also a zone of engagement: c7 (Position B).
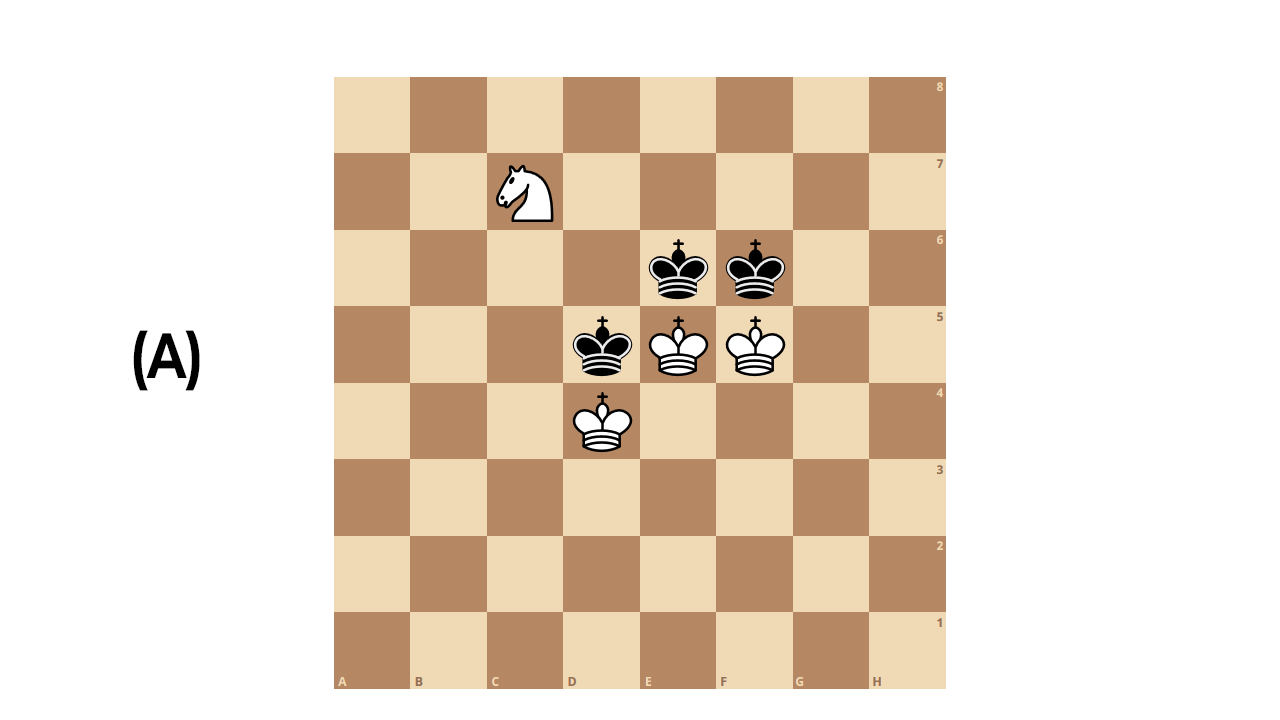
Individual units seem to have a randomly determined initiative. If the d6 enemy piece moves before our d4 unit engages him, but after our assassin jumps, our assassin will land on c7, but not be engaged (Position A), and will jump again, this time to g5 (Position B).
Because of Random Unit Initiative (RUI) order, it is impossible to 100% accurately predict the exact movements of a combat round – only the broad strokes.
Non Assassin Ranged Units:
Will jump to the nearest square that has an enemy within range. They cannot jump over pieces. If this is impossible, they will move one square closer to the nearest enemy, until they’ve got a clear shot to jump to a proper square.

Example (Position A): We have the same frontline as before, on d4, e4, and f4. Our opponent still has the same frontline on d6 e6 and f6. We have a ranged unit with a range of 3 (like Berserker) on a1. After the frontline engages, (assuming our piece on d4 moves first), our ranged unit will move to the closest square that puts them in range of any enemy (Position B), either d3 or c4.
Assassin Ranged Units:
Will jump to the furthest square that has an enemy at maximum range.
Same example as before (Position A), but this time the piece on a1 is an assassin with a range of three – like Phantom Queen. Phantom Queen will jump to either g8 or h7 (Position B).
Rule #3: If there are multiple enemies in their attack range that are equidistant, they’ll attack whichever piece engaged them most recently.
This is why your Dwarven Sniper will be whittling down that Tusk champion, only to change targets at the last second when the enemy’s Lord of Sand hops over to join in the fight.
Rule #4: If there are multiple enemies in the attack range that are equidistant that engaged simultaneously, your piece will attack the piece on the same row.
Because of RUI (random unit initiative), this only really matters at the start of a combat round.
Example (See Above): We have a frontline on d4, e4, and f4, with a ranged unit on e3. Our opponent has a frontline on d5, e5, and f5, with a ranged unit on d6.
Because all of the units have multiple opposing pieces in their range at the same time, the f4 and f5 units will auto attack one another, the d4 and d5 units will attack one another, and the e4 and e5 units will attack one another. Meanwhile, the ranged unit on d6 will target the nearest enemy (d4) and the ranged unit on e3 will target the nearest enemy (e5).
If you don’t understand all of that, don’t worry. I’ll still go into the implications all of that has in regard to position and formation. I just also wanted to give you the building blocks to understand where all of this is coming from.
We’ll start with the basics.
Part Two: Rules For Opponent Targeting Your Pieces
When all eight players are alive, it’s best to just create a good overall formation. You can’t realistically build any counter formations with that many people still alive. When there’s only 4 or 3 people left, then we can work on some counter formations. For now, we’ll look at general formations and positioning.
Rule #1: The units in the front corners of your formation are going to take the most damage, usually.
Let’s take this example (Position A): We’ve got a frontline of three units on d4, e4, and f4, with three ranged units directly behind them.
Our opponent has a frontline from b5 to g5. As we saw in our previous example, d4 and d5 target one another, d4 and e5 target one another, and f4 and f5 target one another, while our ranged units all target the enemy unit in the same row as them.
Meanwhile, the enemy units on c5 and g5 target the only thing in range (our units on d4 and f4) and the unit on b5 moves to the nearest engagement square, c4 (Position B) (c4 is explosive).
When the unit on b5 moves to c4, our ranged unit on d3 is engaged, and will switch targets to b5. So will our unit on d4.
To recap, our frontline unit on d4 is being attacked by 3 units (and if it’s god of war, it will be facing to the left – the enemy it is engaged with), our middle frontline unit is being attacked by one unit, and our right side is being attacked by 2 units.
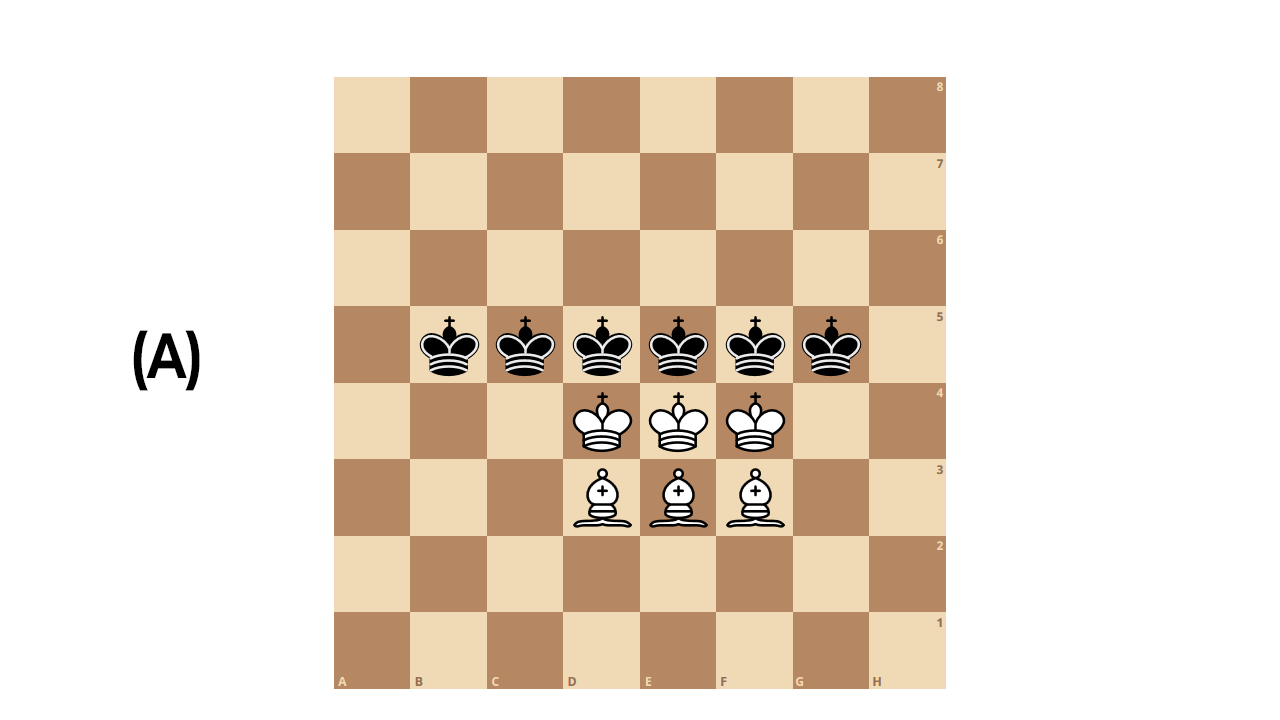
Rule #2: Corner units closer to the center of the board are going to take more damage than corner units closer to the side of the board, usually.
To illustrate this point, take this example (See Above): we’ve got the same formation – frontline on d4, e4, and f4. In this diagram, the pawns represent squares where a unit would likely target d4 if positioned there, the rooks represent squares where e4 would be targeted, and the bishops represent squares where f4 would be targeted.
Of the 32 possible squares for an enemy piece to be on, 16 of them (50%) are likely to attack d4, 4 of them (12.5%) are likely to attack e4, and 12 of them (37.5%) are likely to attack our piece on f4. Assassins placed on those squares wouldn’t follow those rules, of course.
Rule #3: Units placed on the far left (“a” file) or far right (“h” file) edge of the board (in formation) are safer from assassins than units placed on the 1st rank, usually.
I don’t think an illustration is necessary this time. Assassins normally position on the first and second ranks (rows closest to player), and your team moves up ranks towards them (towards middle of board), exposing your back rank.
If an assassin player positions their team instead on the “a” file and “b” file, your team would move across the files towards them, exposing your “harry” file.
Now, with general rules out of the way, let’s go into some specifics.
Formation Examples
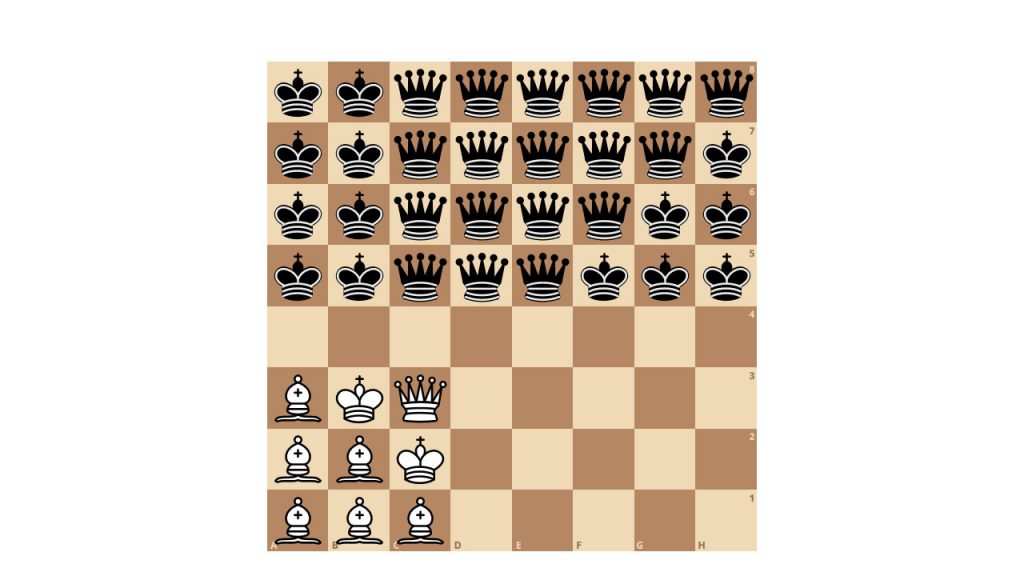
T-Formation
You can focus fire an enemy with a T formation (See Above). In this example, your three ranged units will all target the enemy on e5, while the enemy ranged units are spreading their damage.
Corner Formation
Corner formations are good at keeping your core pieces safe from assassins, and they are good at making sure the main tank is taking most of the damage, but are vulnerable to Area of Effect abilities.

Phantom Queen
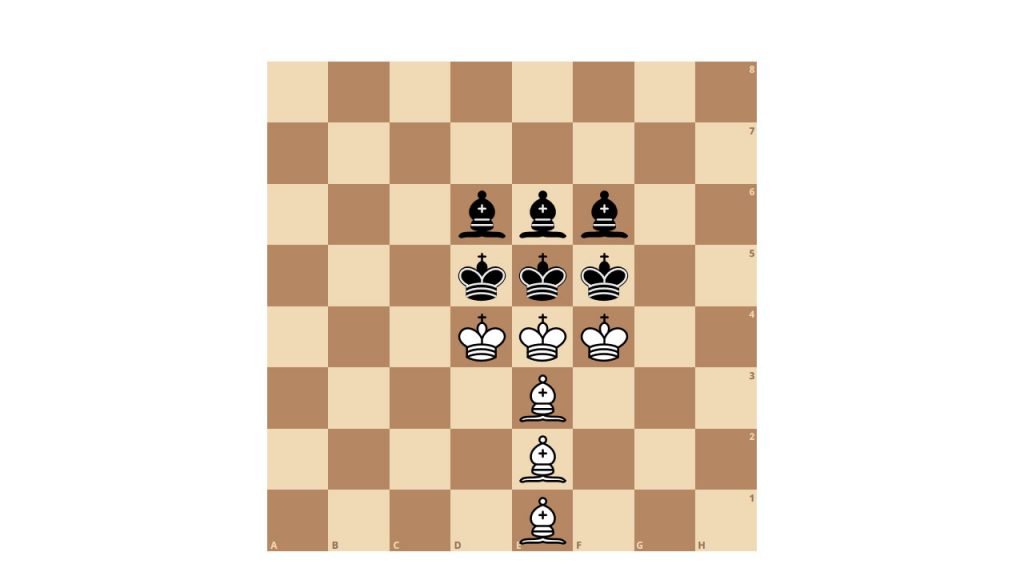
In the early game (Rounds 4-15) Phantom Queen deals great damage, and her ability is superb if she doesn’t jump. I like having her on e3 with a tank on e4 (See Above).
Human Synergy
If you’ve got human synergy, line your humans up in such a way that they’re likely to target different units (put ranged humans in different files than your frontline humans, for example).
Knights
Knight comps like hanging out in the back rows, since their shields can only activate every 3 seconds. Starting them further back means more time of shield coverage once the fighting starts.
Utility Pieces
Utility units like Storm Shaman and Dark Spirit should sometimes be put intentionally in harm’s way, if they have a quick-casting ability that can change the tide of the fight.
Counter Positioning
When the number of opponents has been reduced to a manageable level, it’s good to scout out their formation (remember, their board is flipped around, so a unit that looks like it is on a1 on their board will be on h8 when you defend against them).
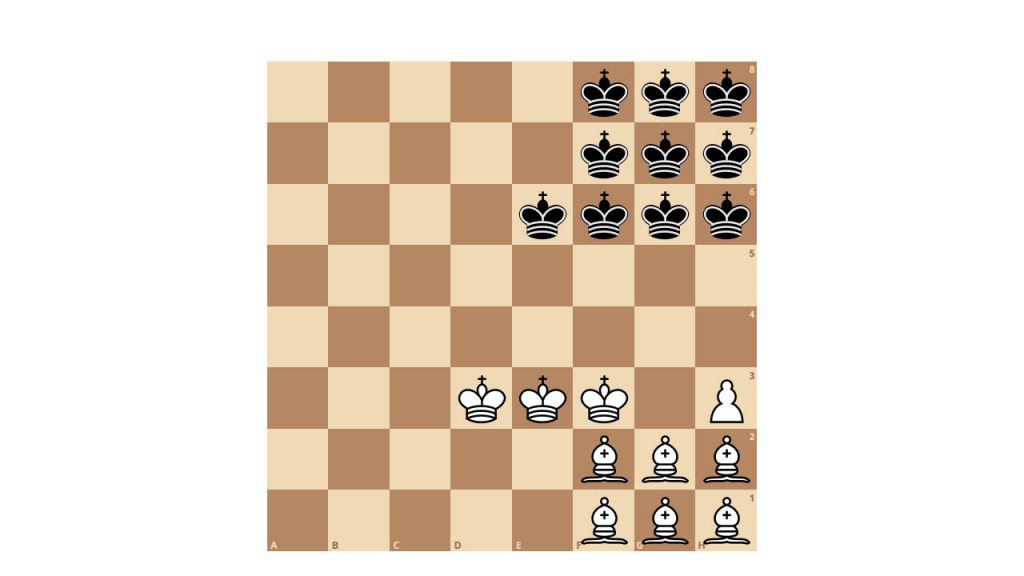
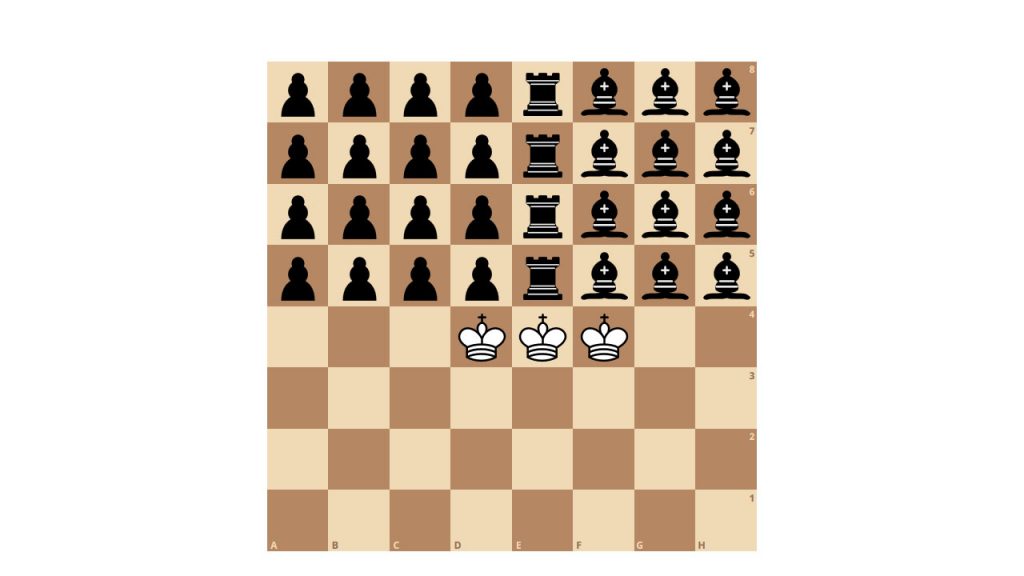
I played a game earlier this week where I was in one-vs-one mode against a Dragons/Knights build. I just picked up my dark spirit, and knew that I would need him to use his ultimate, and quickly, if I was to have a chance to win. My formation looked a little like this (See Above).
My dark spirit was on h3 (White Pawn), allowing the harry file frontliner a clear jump to him, every time. Since it was only one enemy (and it wasn’t a human or taboo witcher), I knew that Dark spirit wouldn’t be silenced, and also wouldn’t be bursted down during his (admittedly quick) casting animation.
If my opponent had scouted my formation, they might have moved their Argali knight there (in fact, I was waiting for it), which would have absolutely required my attention.
On that note, using the information you learned at the beginning of this post, position your humans and Taboo Witcher with scouting to try to shut down important abilities. Doom, Pirate Captain, most legendaries, storm shaman, and siren are all units with very impactful abilities.
Lastly, I’ve noticed that neutral creep rounds do not change targets when a new piece has engaged them. Whether that is by design or a bug remains to be seen.
I think that’s good enough for now. I might be forgetting some things, but there’s a lot of information there to unpack.